

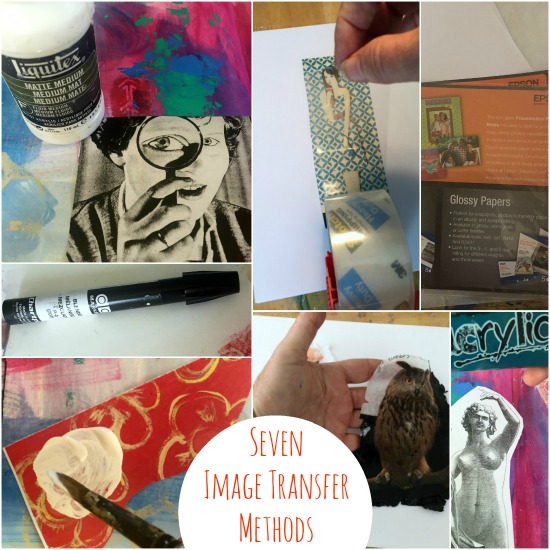
TUTORIAL: SEVEN IMAGE TRANSFER METHODS FOR TONER, MAGAZINE OR INKJET IMAGES
/
Have you tried image transfers in your art journal?
An image transfer is basically a process of lifting the toner of a printed image—the ink—and applying it to another surface. The image itself gets transferred—but it's usually a more transparent image than the original, which makes for great layering.
You'll find tutorials all over the internet for different methods to make an image transfer—but it's difficult to know which process is "best". As it turns out, it depends on what kind of image you want to transfer and for what effect. Below you'll find instructions for seven different ways to make an image transfer using: gel mediums, solvents, acrylic gesso or paint, packing tape, acrylic skins, or specialty printer papers.
First, what you need to know: surface and image
Understand your surface
You can do an image transfer on all kinds of surfaces (depending on the transfer method), including wood, canvas, fabric, glass—and paper, such as an art journal page. However, each surface takes a transfer differently, and some mediums do not work with some surfaces. I am focusing on transfers that work well in art journals, here.
Also, many (but not all) transfer methods use wet mediums to make the transfer, so make sure any layer below the transfer will not activate with water (such as a layer of dried acrylic paint, gesso or matte medium (or mod podge).
You should definitely experiment with surfaces and image transfers—and actually, that is part of the fun.
The type of image matters
Generally, copies of images from laser printers/toner copiers make for the best image transfers. With the right method—as you'll see below—you can also transfer images cut directly from magazines or newspapers OR printouts from inkjet printers, but you have to use the right image transfer method for that type of image.
Some things you should know about images:
- Ironically, we often hear image transfers called "photo transfers", but photographs can not be transferred directly. They need to be copied first.
- Usually, color or black and white images both work. Either way and really, no matter what method, the key is to find images with high contrast.
- Finally, many methods (but not all of them) reverse your image. That may be okay, but if not (such as with words) you should reverse print/copy your image backwards first.
Seven Transfer Methods by Image Type
Like I said, it's important to know which methods work for different types of images. That's why I've sorted these seven different transfer methods by image type. Click on these links to go directly to particular image type (or just scroll through this post for all seven methods):
Laser Printer/Toner Copier Images
Learn how to transfer toner images using three different transfer methods: gel medium, solvents or gesso/acrylic paint.By the way, when we say "laser/printer/toner copier" images, we are talking about laser printers or copy machines that use toner, such as those found at the "FedEx Office, Print and Ship Center. (Why they didn't keep the simple, catchy name Kinko's, I'll never know.) Both use the same toner. The important thing to remember is that when a transfer method requires "toner" images, do not use your inkjet printer. You'll have to use a method that will transfer inkjet images (see below).
Glossy Magazine Images
Learn how to transfer magazine images with two transfer methods: packing tape or gel medium.Inkjet Printer Images
If you want to make a transfer with an image printed on your inkjet printer, these two transfer methods will work: acylic skins or specialty printer papers.Laser Printed/Toner Copier Image Transfer Processes
Gel Medium Transfer

SUPPLIES
- Image from Laser Printer/Toner Copier
This image will transfer backwards so be especially careful of words. You can reverse print/copy your image backwards first if you wish to keep orientation.
- Surface such as an art journal page—any background layer should not activate with water.
- Gel Medium
I recommend Matte Medium by Liquitex or Golden.
- An inexpensive paintbrush or sponge
- Tool for burnishing
Such as a bone folder (typically used for bookbindiing), the back of a spoon, or even the side of a plastic handle on scissors.
- Spray Bottle filled with water
INSTRUCTIONS
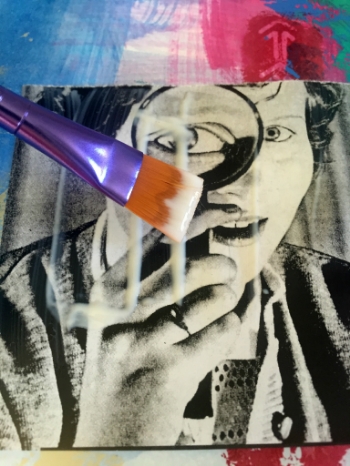
1. Image side up, brush on a light but fully covered layer of a Gel Medium with your inexpensive brush or sponge directly onto the image.

2. Lay the gelled image onto your surface face down and then firmly and fully burnish the back of the image with your burnisher. Start from the middle and work out. If gel medium seeps out from the edges, avoid getting it on top of of the paper backed image. Wipe out and away. Do not let the image slide around; hold securely in one place.
3. Allow to dry completely (you can use a heat gun to speed up drying time, but don't cook it. Let the image have some air dry time. You can let it dry for days or weeks without a problem, but a small gel transfer can also dry in 30 minutes or less (especially when supplemented with a heat gun). Just make sure it's completely dry before proceeding.

4. Once dried, spray water on the back of the adhered image, wet enough that you can rub away the wet paper with your fingers.

5. Rub firmly and continue to spray water until the backing paper is completely rubbed off (this may take a few cycles of spritzing and rubbing), leaving the ink of the transferred image.
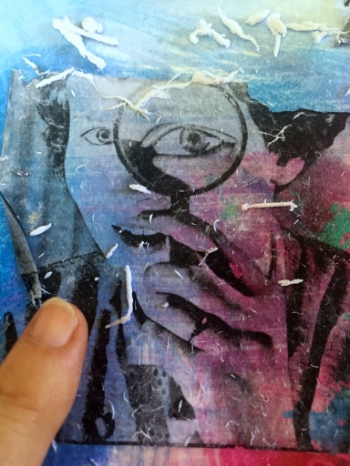
Be firm enough to rub away the paper, but not so firm that you rub away the image that is left behind. If on the other hand some of the image is rubbed away, the imperfection of the transfer can be a lovely effect.

6. Once the image is fully revealed and most of the paper fiber has been rubbed away, let dry. Once dried, some paper fibers will still show, making your image look chalky.

7. Make sure all fibers are rubbed away and then apply a coat of Gel Medium on top to remove that chalkiness. The colors will pop back up. A matte gel will be transparent and not shiny.
Solvent Transfer (such as ChartPak Blender Pens or Citra Solv)

SUPPLIES
- Image from Laser Printer/Toner Copier.
This image will transfer backwards so be especially careful of words. You can reverse print/copy your image backwards first if you wish to keep orientation.
- A ChartPak Blender Pen OR a CitraSolv natural cleaner+applicator
ChartPak pens can be purchased at most art supply stores. ChartPaks are filled with a chemical called Xylene—which is a solvent like Acetone (nail polish remover). It is chemical (and you could alternative buy a can of Xylene as well), and it should be used in a well ventilated area—it's toxic in large doses and smells). You can't beat these pens for ease, though, and the transfer is often quite crisp (depending on your surface).
I do not show a picture, but a product called CitraSolv is also a solvent. It's natural and non-toxic and it can be purchased at a natural foods grocery store, but it's still best to use in a ventilated area (it does have a strong odor). With CitraSolv, vou will also need an inexpensive brush or sponge for application.
- Masking tape (or low stick art tape)
- Tool for burnishing
Such as a bone folder (typically used for bookbindiing), the back of a spoon, or even the side of a plastic handle on scissors.
- Surface such as an art journal page—waterproof surface not required.
INSTRUCTIONS

1. Image-side down, lay image onto your surface. It's best to tape the paper down to ensure the image won't slide.

2. Apply the pen to the back of the image and and start "coloring" with the colorless solvent. Make sure to rub over and fully coat the image (the white copy paper becomes translucent as you go and you can see the image below). Do not saturate the paper, but get it good and coated with solvent.
OR, apply Citr Solv in the same manner as with the pen, except of course using an applicator.

3. While the solvent is still wet, fully burnish the image with your burnisher.
If you are doing a large image, color and burnish (steps #2 and #3) in sections. You can peel up corners of your paper to see how well the image is transferring and, while not moving the paper, repeat steps #2 and #3 until fully transferred.

4. Once transferred, lift the paper and allow image to dry completely (dries relatively quickly).
(Note: you may notice the second picture in the above Solvent instructions shows use of the Chartpak pen on a different art journal page than the other steps in this section. Long story short, I transferred these same flower images in several different places in my art journal and this is the best shot showing you how to use the Chartpak pen—while the actual transfer is better on the blank page as you see below. Remember what I said about experimenting on different surfaces: I did not find that the solvent transfer did well on an a busy acrylic painted surface).
Gesso or Acrylic Paint Transfer

SUPPLIES
- Image from Laser Printer/Toner Copier
This method DOES NOT reverse the image. Words, for instance, will remain readable and not backwards.\
Here, I'm using the same flower paper (toner copied), but with Gesso, not solvent as above.
- Gesso or Acrylic paint of choice
- An inexpensive paintbrush or sponge
- Spray Bottle filled with water
- Tool for burnishing
Such as a bone folder (typically used for bookbindiing), the back of a spoon, or even the side of a plastic handle on scissors.
- Surface such as an art journal page
A waterproof surface is not necessary—you can do a Gesso/Acrylic paint transfer on blank journal paper. However, as you see, I am transferring my image on to a busy acrylic background (on the same page where I made the gel transfer above)—which is fine too.
INSTRUCTIONS
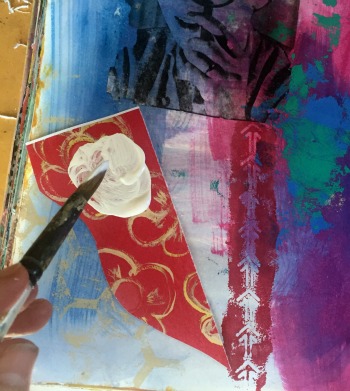
1. Brush a coat of Gesso or acrylic paint directly onto the surface where you want the transfer.

2. Lay the image onto your wet painted surface face down and then firmly and fully burnish the back of the image with your burnisher. Do not let the image slide around; hold securely in one place. Start from the middle and work out. Gesso/paint will seep out from the edges so once burnished so while still wet, work the surrounding gesso/paint as it pleases.
3. Allow to dry completely (you can use a heat gun to speed up drying time, but don't cook it. Let the image have some air dry time. You can let it dry for days or weeks without a problem, but a small acrylic transfer can also dry in 20-30minutes (especially when supplemented with a heat gun). Just make sure it's completely dry before proceeding.

4. Once fully dried, just like with the Gel Medium Transfer above, spray water on the back of the adhered image, wet enough that you can rub away the wet paper with your fingers.

5. Rub firmly and continue to spray water until the backing paper is completely rubbed off (this may take a few cycles of spritzing and rubbing).
6. Once the image is fully revealed and most of the paper fiber has been rubbed away, let dry. Unlike with the Gel Medium Transfer, the dried image has less fiber "chalkiness" when dry and you may not need to coat the transfer with matte medium for clarity (and it is already waterproofed for the next layer (if you desire) as the image is embedded in acrylic.
Here are pictures using the same process as with Gesso but with acrylic paint:

******************************************
Glossy Magazine Image Transfer Processes
Packing Tape
SUPPLIES
- A printed image from glossy magazine page.
This method DOES NOT reverse the image. Words, for instance, will remain readable and not backwards.
- Clear Packing Tape
As found in a drugstore or hardware store.
- Tool for burnishing
Such as a bone folder (typically used for bookbinding), the back of a spoon, or even the side of a plastic handle on scissors.
- A flat pan with sides such as a glass pyrex cake pan—and lukewarm water.
- Spray Bottle filled with water
- Surface such as an art journal page.
INSTRUCTIONS
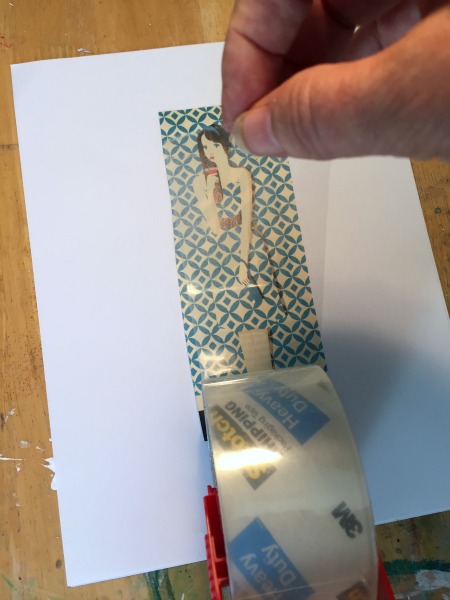
1. Set the image on your table, image side up.
2. Cut a piece of packing tape slightly longer and wider than your image and carefully lay it down over the image (without causing the image to wrinkle).
Note: If your image is wider than the packing tape, lay two or more pieces of tape over the image, slightly overlapping the image. This line will be quite transparent when complete.

3. Firmly and fully burnish the tape on top of the image with your burnisher. Start from the middle and work out. Leave no air bubbles. Cut away any extra tape on edges.

4. Fill your flat pan with lukewarm water and then dunk your image in the pan. Make sure it is fully immersed and then allow it to sit in the water for 10-20 minutes or longer.
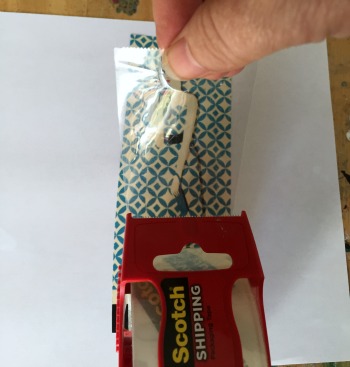
5. Take the image out of the water and set it down on your table, plastic tape side down, paper side up. Do a quick test. Using your fingers, start to rub the paper off the tape. If it rubs easily, keep going. If paper is very difficult to rub off the tape, submerge in pan for more tim.

6. Rub off the paper backing completely.. Add more water and keep rubbing, if necessary, although I find the paper often slides right off, The image is now transferred to the plastic sheet.

You will find that some of the tackiness of the tape is gone, but some is still there. It will adhere to paper so don't lie face down on paper until you're ready. Store on wax paper if desired (or stick onto an edge of a bookcase!) When you are ready to adhere this tape transfer to your surface, use matte medium because tape is not sticky enough by itself for long term. You can cut down the shininess of the tape by brushing a coat of matte medium onto the surface to make it matte rather than glossy.
Gel Medium Transfer for Magazine Cut-outs

******************************************
Inkjet Image Transfer Processes
The general rule of thumb, usually, is to use images from laser printers/toner copiers but not inkjet printers for image transfers. However, there are several effective choices for Inkjet Printer image transfers.
Acrylic Skins

Much like the packing tape method above, this process creates a transparent piece—an acrylic skin—which you can then collage into your art journal or onto another surface.
SUPPLIES
- Image from an Inkjet Printer (also works for laser printer/toner copier images)
This method DOES NOT reverse the image. Words, for instance, will remain readable and not backwards.
- Gel Medium
Matte medium will reduce the shiny surface of what becomes essentially a plastic skin
- Applicator such as inexpensive brush or sponge.
- A flat pan with sides such as a glass pyrex cake pan—and lukewarm water.
- Spray Bottle filled with water
- Surface such as an art journal page.
INSTRUCTIONS

1. To test types of images for this process, I cut out an image of a bird from my inkjet printer and I copied the owl on a toner copier. Lay images on table, image side up.

2. Apply a thin coat of Gel Medium onto the image. Let dry completely. Apply a second thin coat and let dry completely. Continue to add layers, drying completely between each coat, until you have built up an acrylic skin. Here, I applied six, thin coats of matte medium to both images.
Note: Experiment with thickness. Too thin and skin will not withstand the water removal process. Too thick and skin will be opaque. Avoid thicker layers, as drying time for each coat takes much longer. It is essential that the acrylic skin is completely dry before continuing.

3. Once completely dry, fill your flat pan with lukewarm water and then dunk your image in the pan. Make sure it is fully immersed and then allow it to sit in the water for 10-20 minutes.
4. Take the image out of the water and set it down on your table, acrylic side down and paper side up.

6. Like with the packing tape method above, rub off the paper completely from the acrylic skin. Spray with more water and keep rubbing.
The image is now transferred and is in fact plastic skin. You can adhere this transfer to your surface with matte medium.
Specialty Papers Inkjet Transfer

SUPPLIES
- Image printed with inkjet printer on specialty papers
You can run images through your inkjet printer on specialty papers such as the following for varying effects. Generally, they will probably be more "gauzy" and painterly and less clear and crisp—but worth experimenting:
- Label Paper - that is, from a box of printer labels, such as manufactured by Avery and sold at office supply stores. REMOVE THE LABELS and use the silicone backing paper (silicone side).
- Inkjet Transparency paper - manufactured to run through inkjet printers and available at office supply stores. PRINT ON ROUGH SIDE.
- Glossy Photo Paper - for Inkjet Printers
- Iron On Paper - for Inkjet Printers
- Surface such as an art journal page—waterproof background.
- Tool for burnishing (or iron in case of iron on paper)
Such as a bone folder (typically used for bookbindiing), the back of a spoon, or even the side of a plastic handle on scissors.
INSTRUCTIONS

1. Print your image directly onto the specialty paper. Be careful with the images from the printer - they are not "fixed" so the ink will easily come off the paper (that's the point).

2. Image side down, press the specialty paper image onto your surface.

3. Burnish softly. You may only need your hands and not a burnishing tool (or iron if using iron on paper). Be careful not to move the paper while rubbing.

4. Lift paper from surface to reveal transferred image. Think about applying fixative after transfer as inkjet ink is not waterproof.
Note: You may notice that the above image includes a word and it transferred backwards. C'est la vie, as the girl herself would say—looks like a good place to collage in my next layer. I will apply fixative to this image first, though, because inkjet ink is not waterproof and would activate with matte medium otherwise.